Connecting backend modules and web frontend components
One common aspect of data analytics is of course data visualization. DASF supports this by providing a variety of web frontend visualization components. Since we initially developed DASF in a geo-scientific context we start with some examples visualizing spatio-temporal data.
Flood Event Explorer
For a general impression of what is possible with DASF you can checkout the Digital Earth Flood Event Explorer. It was developed with DASF. In case you don’t want to dive too deep into the individual workflows of the Flood Event Explorer, you might watch some videos showing the usage of the tool and providing some overview of what kind of visualizations are supported. The videos are linked in the applications landing page linked below or via the projects youtube channel.
Homepage: https://digitalearth-hgf.de/results/workflows/flood-event-explorer/
Source Code Repository: https://codebase.helmholtz.cloud/digital-earth/flood-event-explorer
Deployed Application: http://rz-vm154.gfz-potsdam.de:8080/de-flood-event-explorer/
Citation Reference: Eggert, Daniel; Rabe, Daniela; Dransch, Doris; Lüdtke, Stefan; Nam, Christine; Nixdorf, Erik; Wichert, Viktoria; Abraham, Nicola; Schröter, Kai; Merz, Bruno (2022): The Digital Earth Flood Event Explorer: A showcase for data analysis and exploration with scientific workflows. GFZ Data Services. https://doi.org/10.5880/GFZ.1.4.2022.001
The DASF map component: Demap
The geo-visualization backbone of DASF is a web map component called Demap which is part of the dasf-web library. The De part originates from the Digital Earth project through which the development was funded. It is a Vue component and based on the popular Openlayers (https://openlayers.org/) library. In order to use the components provided by dasf-web you have to include it in your vue-based web application (also see: Setup a web-application project).
As any other custom Vue component import the Demap and add it to the html template of your own page/component. The map component supports the following customization properties and events:
Props
Name |
Type |
Default |
Description |
|---|---|---|---|
zoom |
number |
9 |
Initial zoom level of the map |
projection |
string |
‘EPSG:3857’ |
EPSG-Code of the projection used by the map |
center |
[number, number] |
[13.740107, 51.055168] |
Coordinates to center the map in geographical coordinates (EPSG: 4326) |
legend-collapsed |
boolean |
false |
If set, the legend will be initially collapsed |
no-legend |
boolean |
false |
If set, the map component will disable it’s integrated legend / layerswitcher component |
force-actions-append |
boolean |
false |
If set, custom layer actions registered via |
map-view |
ol.View |
null |
External |
show-osm |
boolean |
false |
If set, adds the default OpenStreetMap tile layer as a basemap |
enable-rotation |
boolean |
false |
If set, enables the map rotation feature (mobile: pinch; desktop: alt+shift+drag) |
disable-auto-zoom-to-layer |
boolean |
false |
If set, the map does not automatically pans and zooms to newly added layers |
start-layers |
ol.Layer[] | Promise<ol.Layer[]> |
null |
An array of layers (or a Promise resolving to an array of layers) that will be added to the map right from the start (or as soon as the Promise resolves). |
Events
Name |
Description |
|---|---|
item-selected |
called with an array of ol.Feature that have been selected in the map |
load-custom-file |
called with a File that was drag’n’drop onto the map, but no internal file handler was found supporting the files format. (integrated file handlers: .geojson are .nc) also see: add-layer component |
set-roi |
called with a ol.Geometry that the user has selected as a region of interest through the roi layer action. |
unset-roi |
called when the user unselects the previously selected roi geometry. |
layer-added |
called with a ol.Layer instance that was just added to the map component via the |
Api
In case you created an object reference (e.g. via the @Ref annotation) for the Demap component you can utilize the following api to interact with it.
Name |
Description |
|---|---|
getLayers |
Returns an array of all layers registered with the map |
updateSelectInteraction |
Accepting an optional ol.StyleLike style and an optional FilterFunction used for the build-in feature selection interaction. Also refer to OL Select API |
updateSelectedFeature |
Accepting an instance of ol.Feature and selecting it, if the internal selection interaction is enabled, e.g. via ‘updateSelectInteraction’ |
updateSelectedFeatures |
Accepting an array of ol.Feature and selecting them, if the internal selection interaction is enabled, e.g. via ‘updateSelectInteraction’ |
addBaseLayer |
Accepting an instance of ol.TileLayer to be added as an additional base layer |
startEditLayer |
Accepting an instance of ol.Layer and initializing the build-in editing feature in case the provided layer has a ol.VectorSource. This is mainly used by the edit layer LayerAction. |
stopEditLayer |
Finishes the build-in editing feature. This is mainly used by the edit layer LayerAction. |
createVectorLayer |
Returns a new instance of an ol.VectorLayer, accepting a title string, an optional ol.VectorSource an optional array of DemapLayerActions |
Demap.isVectorLayer |
Returns |
addLayer |
Accepting an instance of ol.Layer and adding it to the map, adding new layers to the map through this method also creates color scales for all numeric properties of the underlying data |
panAndZoomToExtent |
Accepting an instance of ol.Layer or ol.Extent and pans and zooms the map so the entire (layers) extent is visible. |
getMap |
Returns the internally used ol.Map instance |
getThematicLayerGroup |
Returns the ol.LayerGroup containing all added non-base layers |
dispose |
Disposes the ol.Map context by setting its target element to |
Common spatio-temporal datastructure
Now the initial goal was to connect data produced/provided by backend modules with a web visualization component, e.g. Demap.
For this to work we need a common datastructure for the data. In case of spatio-temporal data we rely on the NETCDF format. In the scope of a python backend module the popular xarray library can be used to load, create or manipulate the data. Finally we send it to the front-end application for visualization. In order to interpret the netcdf data the dasf-web library provides a NetcdfRasterSource class, which can be wrapped into a TemporalImageLayer and directly added to the map component.
Network Common Data Format (NetCDF)
The NetCDF is a pretty generic format, so its practically impossible to interpret all possible data arrangements. Therefore we need to enforce certain conventions. For this we assume the NetCDF data to follow the commonly used CF conventions.
Especially important is the global crs attribute, defining the coordinate reference system for the spatial data. It has to be a string containing the EPSG code of the CRS, e.g. 'EPSG:4326'.
Demap example
The following example creates a web front-end utilizing the Demap component.
 1<template>
 2  <v-container
 3    style="margin-bottom: 35px; padding-top: 100px; padding-bottom: 20px"
 4  >
 5    <v-card :loading="dataPending">
 6      <v-card-title>Spatio-Temporal Data Example</v-card-title>
 7      <demap
 8        ref="demap"
 9        show-osm
10        legend-collapsed
11        :center="[13.064923, 52.379539]"
12        :zoom="16"
13        style="height: 50vh; min-height: 300px;"/>
14    </v-card>
15  </v-container>
16</template>
17
18<script lang="ts">
19import { Component, Vue, Ref } from 'vue-property-decorator'
20import Demap from 'dasf-web/lib/map/Demap.vue'
21import SpatioTemporalClient from '~/lib/SpatioTemporalClient'
22import TemporalImageLayer from 'dasf-web/lib/map/model/TemporalImageLayer'
23
24@Component({
25  components: { Demap }
26})
27export default class SpatioTemporal extends Vue {
28  @Ref('demap')
29  private demap!: Demap
30
31  private dataPending = true
32
33  protected created (): void {
34    const backend: SpatioTemporalClient = new SpatioTemporalClient()
35
36    backend.getData().then((dataLayer: TemporalImageLayer) => {
37      this.demap.addLayer(dataLayer)
38      this.dataPending = false
39    }).catch((reason) => {
40      console.warn(reason)
41    }
42    )
43  }
44}
45</script>
Note that we create an object reference to the map via the @Ref annotation in line 28. We will use this reference later to programatically interact with the map. Event without the backend part (lines 34-43) the map component is fully functional. Since the show-osm property is set the map shows an OpenStreetMap base layer. User can add new layers either via drag’n’drop or via the built-in legend menu.
Backend providing spatio-temporal data
Now that we created the front-end part, let’s create a backend module providing the data that the front-end will visualize later on. We keep it simple and expose a get_data() function returning a xarray.Dataset that we load from a local netcdf file. In general the data could also be a result of some algorithm or loaded from an URL, depending on you use case.
 1from demessaging import main, configure
 2from demessaging.validators.xarray import validate_dataset
 3from demessaging.serializers.xarray import encode_xarray
 4import xarray as xr
 5
 6__all__ = ["get_data"]
 7
 8
 9@configure(
10    return_serializer=encode_xarray,
11    return_validators=[validate_dataset],
12)
13def get_data() -> xr.Dataset:
14    ds = xr.load_dataset('sample_data.nc')
15    return ds
16
17
18if __name__ == "__main__":
19    main(
20        messaging_config=dict(topic="spatio-temporal")
21    )
Note that xr.Dataset is not a type that is easily serializable. That is why
you have to tell DASF whow to serialize the data. For xarray.DataArray and
xarray.Dataset you find this information in the
demessaging.validators.xarray and demessaging.serializers.xarray
modules. You may use this workflow as a template to implement your own
validators and serializers.
For most websocket based message brokers there is a maximum message size of 1MB configured. So, depending on the size of your data, we might exceed this size. DASF automatically fragments messages that are too big. In case you want to avoid fragmented messages you need to increase message brokers message size as well as DASF payload size.
WebSocket Message Size
WebSocket connections define a maximum message size (usually: 1MB). DASF will fragment all messages exceeding a given threshold called max_payload_size. The current default is 500kb.
In order to work, the max_payload_size must be smaller than the maximum message size of the used message broker.
e.g. Apache Pulsars message size can be configured in the standalone.conf via the webSocketMaxTextFrameSize parameter.
The max_payload_size for a backend module can be configured in the config passed to the main() function (see: demessaging.config.messaging.WebsocketURLConfig()).
The spatio-temporal client stub
In order connect the backend and the Demap visualization, we are going to the need the typescript client stub for the backend module. This looks almost identical as our hello world client stub (see The client stub), except that we don’t return the payload string, but convert it to a TemporalImageLayer based on a NetcdfRasterSource.
 1import PulsarConnection from 'dasf-web/lib/messaging/PulsarConnection'
 2import { PulsarModuleResponse, PulsarModuleRequest, PulsarModuleRequestReceipt } from 'dasf-web/lib/messaging//PulsarMessages'
 3import { DefaultPulsarUrlBuilder } from 'dasf-web/lib/messaging//PulsarUrlBuilder'
 4import TemporalImageLayer from 'dasf-web/lib/map/model/TemporalImageLayer'
 5import NetcdfRasterSource from 'dasf-web/lib/map/model/NetcdfRasterSource'
 6import b64a from 'base64-arraybuffer'
 7
 8export default class SpatioTemporalClient {
 9  private pulsarConnection: PulsarConnection
10
11  public constructor () {
12    this.pulsarConnection = new PulsarConnection(new DefaultPulsarUrlBuilder('localhost', '8080', 'default', 'spatio-temporal'))
13  }
14
15  private createGetDataRequest (): PulsarModuleRequest {
16    const request = PulsarModuleRequest.createRequestMessage()
17    request.payload = btoa(JSON.stringify({ func_name: 'get_data' }))
18
19    return request
20  }
21
22  public getData (): Promise<TemporalImageLayer> {
23    return new Promise((resolve: (value: TemporalImageLayer) => void, reject: (reason: string) => void) => {
24      this.pulsarConnection.sendRequest(this.createGetDataRequest(),
25        (response: PulsarModuleResponse) => {
26          if (response.properties.status === 'success') {
27            // parse the payload
28            const netcdfB64 = JSON.parse(atob(response.payload))
29            // convert the b64 into an arraybuffer and parse the buffer into an ol.Source object
30            NetcdfRasterSource.create({
31              data: b64a.decode(netcdfB64)
32            }).then((src: NetcdfRasterSource) => {
33              // wrap ntcdf source into a layer
34              const imageLayer = new TemporalImageLayer({
35                title: 'spatio-temporal data',
36                source: src
37              })
38
39              resolve(imageLayer)
40            })
41          } else {
42            reject(atob(response.payload))
43          }
44        },
45        null,
46        (receipt: PulsarModuleRequestReceipt) => {
47          reject(receipt.errorMsg)
48        })
49    })
50  }
51}
Finally we can add the TemporalImageLayer returned by the client stub to our Demap via the addLayer method (line 37 of Demap example).
The resulting visualization will look like the following:
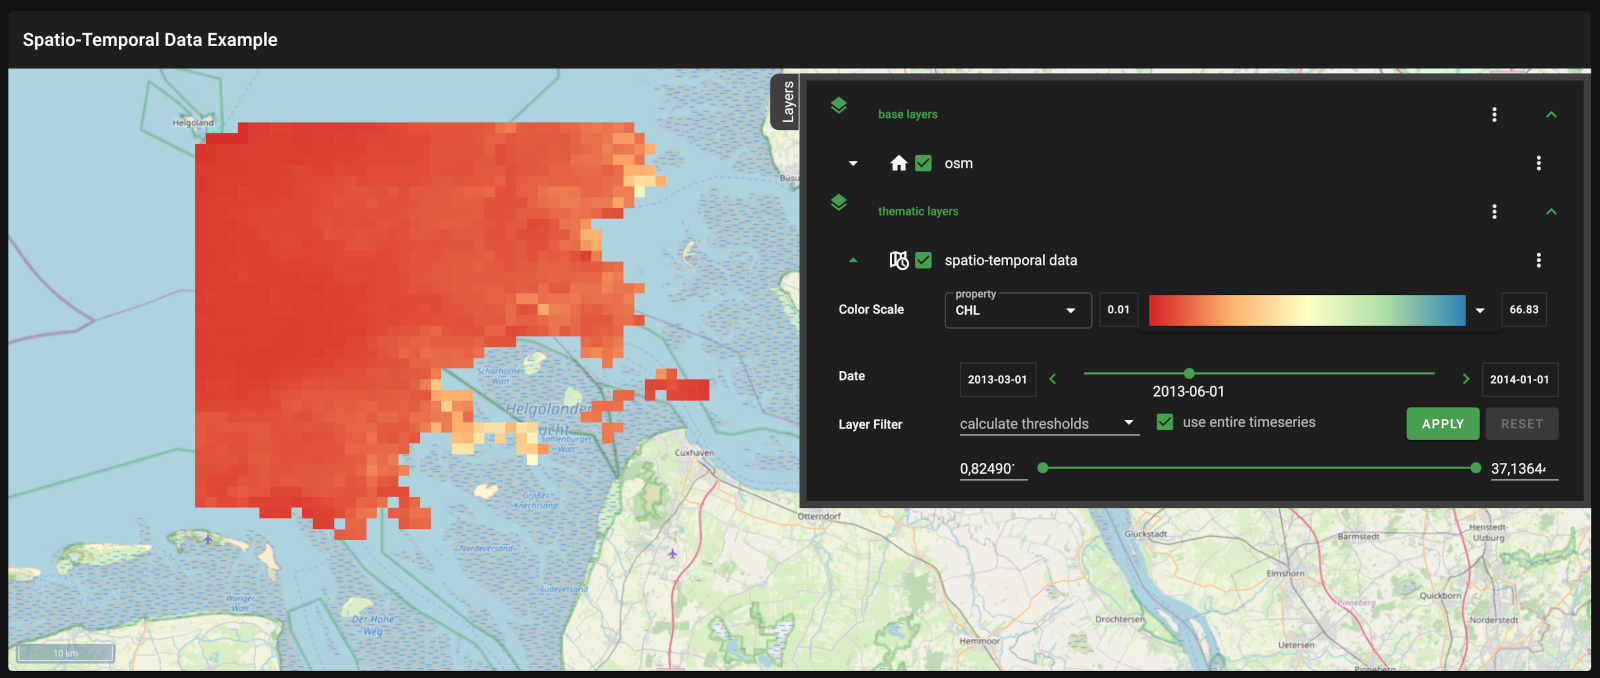
While you can explore the spatial dimension with the maps pan&zoom functionality, the selection of the rendered data variable and the used color scale are possible through the legend component. In order to browse through the temporal dimension, the legend component provides an intuitive time-slider.